Storm Glazing

Among some, outside storm glazing is a contentious issue. We strongly recommend that all stained glass windows are covered on the outside with tempered or non tempered glass dependent upon the possibility of vandalism. Some churches have claimed that the amount of money spent on exterior glazing has been recovered within five years through fuel savings.  All exterior glazing should be vented.  We recommend glass as opposed to acrylic. Acrylic is a petroleum based product that scratches easily, discolours and becomes extremely brittle over time.


Our glass is wrapped in low profile aluminum and electrostatically painted with a pigment that closely matches the exterior colour of the frame.


Here we have an example of old lexan storm glazing protection being removed from a church and new tempered glass being installed.  The lexan has yellowed over the years causing a reduction in light entering the the window, as well as decreasing the beauty of the building and stained glass window behind it.

Here is another example of a large set of windows before and after where we remove the old lexan and replaced it with tempered glass.

Front of Church BeforeFront of Church After

Quite a contrasting difference between using glass over lexan.

Light Boxes

There are instances when a church is gifted a window or windows from another church that is closing.  Probably, due to inconsistency of size the window cannot be installed in an existing opening in the recipients building. Therefore, a light box is made to fit the window by our expert millworkers. Light boxes are made from a hardwood, usually, oak, mahogany, maple or cherry. The stained glass is illuminated with fluorescent fixtures that are screwed snugly to a wooden back. Between the fluorescent bulbs and the stained glass is a sheet of white translucent plastic that diffuses the light so no hotspots occur when the stained glass is viewed. The stained glass and diffused plastic is installed in a hinged door that can be opened and closed making the fluorescent lights serviceable. Robert McCausland Limited is an expert in this area of stained glass recovery.


Manufacturing Process

The following steps will guide you through the process

(from the inception of the ideas to the full installation of the Stained Glass Window)

so you may fully appreciate this time needed to complete this 12 step process.


1. Accurate Measurements & Setting information.
It is key to get the correct measurements of the window opening as well an idea of the other existing stained glass windows and the interior decor of building or church that the window will be installed in.

2.  Discuss Window Ideas with Client
We may show the customers some stock designs so that there is a better understanding of what they can have for their window openings.  The subject of the window is usually determined after the first meeting with RML.

3. The In house Artist will Create a Design
We take many things into consideration so that the design will fit with the style of the existing windows of the church as well as the donor’s & committees needs. All designs are created with a one inch to one foot scale so that it is easy to visualize. In the case that the church does not have any stained glass windows, the designer will provide a preliminary plan giving the church committee some suggestions for future stained glass windows down the road.  For example the theme in a church may be  showing the life of Jesus Christ from birth, then preaching , then dying on the cross and then resurrection.

3.  Designs are Approved Prior to Production
The design must be approved by all parties concerned prior to production commencing.  Prices are discussed as well as an expected date of delivery or installation.  RML requests a deposit of 50% of the total cost of the window.

4.  The Window Design is Initiated
The design will be enlarged to represent a full scale of the hand designed stained glass window. 

5. 
The Glass Cutter Chooses Pattern and Hand Blown Glass
Our glass cutter will choose the best colours and glass pieces to create the window from the full scale drawing. They will cut the design into patterned paper.  Each piece of the patterned paper will be skilfully created to the design (making allowance for the size of the lead in between each glass).  After the paper patterns are completed, the glass cutter will look at the colour of the design and pick out the colour of each piece with the paper pattern and start cutting the glass piece by piece.

6.  The Painters Picks the Glass
The painter will have to select the best glass pieces and paint a trace line (outline) on the glass.  When all the preliminary trace lines are done, the painter then loads the glass and puts the pieces onto trays filled with camel white(limestone).  The limestone trays prevent the glass from warping during the firing process.  The glass has to be fired from bottom to the top, meaning it will have to be fired from cold so that the heat builds up gradually to prevent the cracking of the glass.  At the end of the firing process, the glass has to be cooled gradually so that the glass will not shock or crack. 

7.  The Painter Puts on the Shading and Background Highlights
After the glass pieces are all fired with traced lines, the glass pieces will be waxed up on an easel and then the painter will  put on the shading and background highlight of the whole window except the  flesh parts of the body such as the face, hands and feet.   After all the shading of the background of the windows are done, each piece will be knocked down carefully so that no wax attaches on the glass.  Each piece of glass will then be put back on the limestone trays and another firing process of the glass will begin.  The flesh parts of the windows (such as the hands, face and feet) will have to be handled separately.  These flesh parts will be matted and then needled to get the softness required to look life-like. Again, the glass will be re-fired.  The pieces will be taken out to put on hair colour enamel, flesh enamel or some  ruby colour for the lips  After all enamels are put on, the glass will be  fired again for the last time.  After all the firing are done, all trays of glass will be put on the glazier's bench.

8.  The Glazier Puts the Window Pieces Together
The glazier will have to put all the glass on the cut line.  Then he will have to start glazing the window together by joining them with lead.  After all lead work is completed, he will then have to solder the lead joints together.


9.  The Window is Cemented
After the window are leaded and soldered, then the window have to be cemented to make them waterproof.

10.  The Window is Dried
Each window has to be dried  for a couple of days and then put on the easel to be viewed by the painter to complete the final touches.

11. 
The Window is Shipped in a Custom Crate
For windows that are to be installed out of town, the company builds custom crates and then ships to the destination or for local installations  the company drives the window in the truck.

12. The Window is Installed

The window is professionally installed by Robert McCausland Ltd or a reputable company with experience.


How to Order

A client initializes contact with us usually either by telephone or email. From our initial contact, we glean from the client the approximate size of the window and the proposed subject matter.

We make an appointment with the client and make a site visit. We accurately measure the window and make templates if required. We show the client pictures of windows that we have made prior in order that they can further decide on a subject for the window. We further observe the architecture of the building where the window is to be installed to further ascertain the style of window. If there are stained glass windows already in the building. We try to be as polite as possible and match them as closely as possible in style and treatment.

After subject matter has been determined we proceed to make a customized scale water colour rendering. The design is usually one inch to the square foot. This we show to the client for their final approval. We often times give the client coloured copies of the design which is theirs to keep and distribute to other family members.

When the design has been approved we invoice for a 50% deposit and proceed with the making of a full size working drawing of the window. This drawing is kept in house and enables or glass cutters to make patterns and our glass painters to accurately paint onto the glass.

The glass is then cut. Our glass cutters choose from our hundreds of shades of coloured, antique, hand blown glasses, the glass that is most representative of the colours in the rendering that was shown to our client. Because of our large inventory of glass, we can match these colours exactly. Paper patterns are made using the full size drawing as a template. Paper patterns are placed on the surface of the glass and this assures utmost precision in cutting accuracy.


WE ENCORAGE OUR CLIENTS TO VISIT OUR STUDIO TO SEE THEIR WINDOW BEING MADE

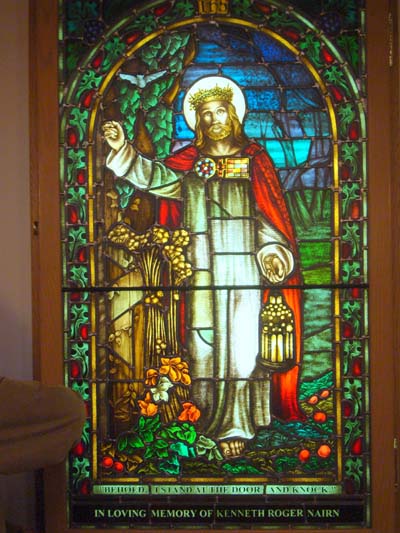
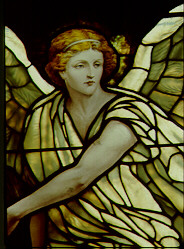
After the glass has been cut, the glass is then sent to the glass painters. The glass is already pre coloured. The glass painters draw lines on the glass to create an image that blocks out the sun, thus creating an image on the glass. There are only a few qualified glass painters in the world today who are fluent in all aspects of glass painting. Our glass painters have apprenticed with our firm and have learned from individuals who have gone on before. All of our glass painters are university graduates in fine arts and have demonstrated the ability and interest to carry on this great tradition. The faces in our windows are second to none. Often times we are called upon to create a face on glass of a famous person or loved one. We use a special lead oxide pigment to paint our glass. The glass is fire in a kiln at approximately 1200 degrees. At that temperature the surface of the glass begins to melt and the paint adheres into the glass permanently. Washing the window with a mild detergent should not remove any of the paint. Flesh glass goes through four different painting and firing processes.

We assemble our windows with our specially made leads. The lead fitter is responsible for choosing the leads that most flatter the design of the window. At this stage the sizing of the window is also checked to assure that it complies with the size of the window into which it is to be installed. The window is soldered with 60/40 solder (60% lead and 40% tin) where the leads intersect both on the front and backside of the window.

After assembly the window is cement back and front with a specially made grouting compound. Grouting compound specially formulated at our studio is forced between the leaf of the lead and the glass. This makes the window waterproof and affords a degree of rigidity to the window.

Our windows are made in sections. One fits on top of another. Between each section is a T bar. The T bar is screwed and inset into the rebate of the opening upon installation. The T bars are fitted with clips to hold the stained glass in place. Intermediary round bars are often added to the windows as well upon installation to assure reliance.

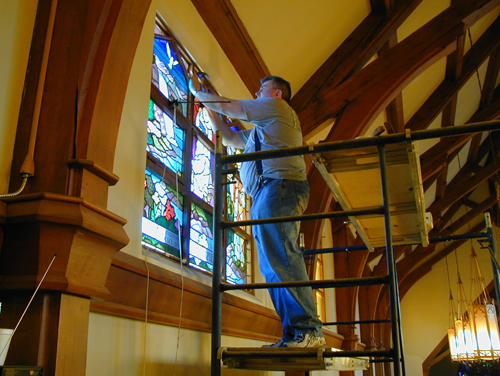
The last process and certainly not least in the production process is installation. Often times we install new stained glass windows in old church frames and older homes. We observe the conditions very carefully in order to verify that the new stained glass can be optimally installed. The old window and stop holding the window in place are removed. The rebate is cleaned very carefully and the opening is checked for square. We start by installing the new panels from the bottom up. After first checking that the window fits properly, sealant is drawn on the rebate and the window attached by nailing through the perimeter lead. The window cannot be installed too tightly as space has to be left for expansion and contraction especially in colder climates. T bars and round bars are installed to provide support for the window. New stop is installed on the interior.

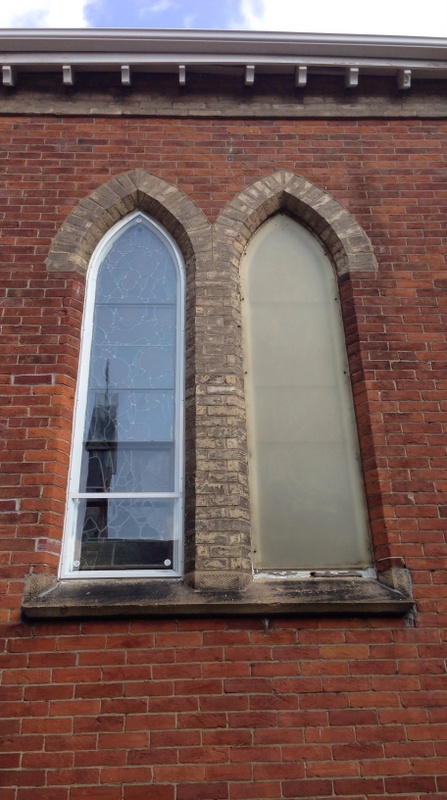
We recommend properly vented exterior tempered glass to provide protection for the window where vandalism could be a problem. Exterior glass also affords thermal protection and assists in preventing heat loss. Our glasses are often installed into a low profile aluminum frame and screwed to the exterior frame. The aluminum frame is electrostatically painted a colour most closely to the exterior colour of the wood frame.


Page 1 of 2